The Required settings
There are six required settings when configuring your NetSuite connector with SynchUP.
- Account Id
- Consumer Key
- Consumer Secret
- Token
- Token Secret
- Max Concurrent Api Calls
Follow the steps outlined below to acquire these values in your NetSuite environment
1. Create an Integration Record
The Integration Record identifies the SynchUP application in NetSuite's system.
IMPORTANT! After clicking save, this is the ONLY time NetSuite will display your Consumer Key and Consumer Secret. After navigating away from this screen you will not be able to retrieve these values again. Ensure you record these in a safe place
- Ensure you're logged into NetSuite as an administrator
- Go to Setup > Integration > Manage Integrations
- Alternatively, perform a global search for page:integrations
- Choose New on the results page
- In the Name box fill out a descriptive name for your SynchUP integration
- Ensure State is Enabled
- Under the Authentication tab check the Token-Based Authentication checkbox
- Click Save
- Record the Consumer Key and Consumer Secret values displayed at the bottom of this page in a safe location

2. Enable Token-based Authentication
SynchUP requires NetSuite's Token-based Authentication to be enabled. You may following these steps to check that this feature is enabled within your NetSuite environment
- Ensure you're logged into NetSuite as an administrator
- Go to Setup > Company > Setup Tasks > Enable Features
- On the Enable Features page, go to the SuiteCloud subtab
- Scroll to Manage Authentication
- Enable Token Based Authentication
- Click Save

3. Create a Token Role
The account that will be associated to the integration will need token permissions. To achieve this we will create a new Token Role in NetSuite
- Ensure you're logged into NetSuite as an administrator
- Go to Setup > Users/Roles > Manage Roles
- Alternatively, perform a global search for page:role
- Choose New Role on the results page
- Ensure the role matches these top-level settings

- Under the Permissions tab ensure these permissions are set
- Transactions

- Lists
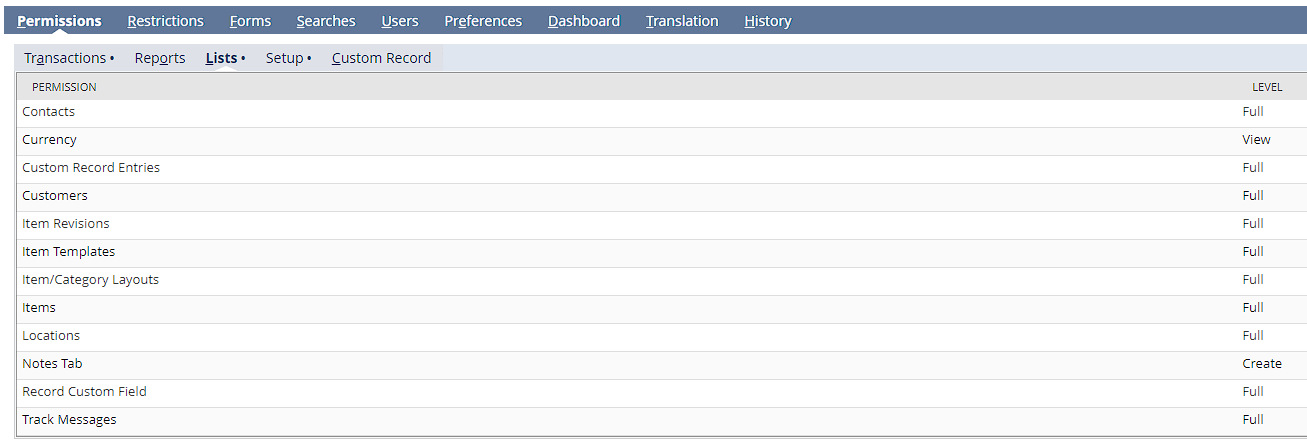
- Setup

- Transactions
- Click Save
4. Add Token Management Permissions
The SynchUP integration must be associated to a user in NetSuite. Snapshot recommends you choose a user that is specifically designated for integrations such as these, or a user that you are certain will never be deactivated or deleted.
- Ensure you're logged into NetSuite as an administrator
- Go to Setup > Users/Roles > Manage Users
- Alternatively, perform a global search for page:employees
- Click the username for whom you want to implement implement token-based authentication
- If no user exists that you wish to associate your SynchUP integration, feel free to create a new user for this purpose
- Click Edit
- Go to the Access tab
- In the Roles subtab add the token auth role you created in step 3 of this guide
- Click OK
- Click Save

5. Create Access Tokens in NetSuite
With the preliminary steps completed, it's time to generate the Token ID and Token Secret necessary for the SynchUP integration.
IMPORTANT! After clicking save, this is the ONLY time NetSuite will display your Token ID and Token Secret. After navigating away from this screen you will not be able to retrieve these values again. Ensure you record these in a safe place
- Ensure you're logged into NetSuite as an administrator
- Go to Setup > User/Roles > Access Tokens
- Alternatively, perform a global search for page:tokens
- On the Access Tokens page, click New Access Token
- In the Application Name drop-down, select the application you set up for the integration earlier
- In the User box enter the name of the employee to whom you assigned the token role
- In the Role drop-down, select the custom role you created earlier
- In the Token Name box, enter the name you want to assign to the token. This name should be descriptive for easy identification later
- Click Save
- Record the Token Id and Token Secret values displayed at the bottom of this page in a safe location

6. Account ID
- Ensure you're logged into NetSuite as an administrator
- Click Setup
- Go to Setup > Integration > SOAP Web Services Preferences
- Retain the Account ID displayed under the Account ID heading
7. Max Concurrent Api Calls
NetSuite has an Api concurrency limit for all integrations connecting to your NetSuite environment. The amount of concurrent Api calls varies depending on the tier of service you have with NetSuite. To learn more about concurrent Api limits read the article below or reach out to your NetSuite representative
https://docs.oracle.com/en/cloud/saas/netsuite/ns-online-help/bridgehead_156224824287.html
SynchUP gives you the ability to limit the amount of concurrent Api calls it will make via the Max Concurrent Api Calls setting. For optimal performance most users will find a value between 3 to 6 sufficient for their integration, but varies depending on the amount of jobs, intervals the jobs run at, and amount of data being transferred. If you're seeing errors in your jobs relating to going over your max concurrent api limit please reach out to appsupport@snapshotdesign.com and we'll be happy to find what value works for you
8. Complete Setup
You should now have the six necessary values to complete your NetSuite Integration with SynchUP. If you're using an application that lets you record these values within SynchUP enter them now. If you're working with a Snapshot Integration Specialist to complete your integration, please give that person this information