Overview
SynchUP offers a fundamental Translation Engine that enables you to effortlessly map different properties to each other. It even allows you to perform basic translations and set default values. However, there may be times when you require more advanced translations. This is where the SynchUP Script Engine comes into the picture.
The SynchUP Script Engine allows you to write your own JavaScript script to be applied after the SynchUP Translation Engine has completed its mapping. You can utilize standard JavaScript syntax to execute any complex or advanced translations that you need.

SynchUP Script Engine Basics
To access the SynchUP Script Engine, go to the Job details and click on the Mapping tab. Within the Mapping tab, you will find the Script Engine subtab.
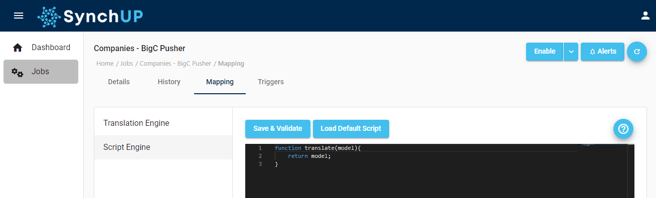
On any new job, you will notice that the default Script is already filled in. It is important to note that every SynchUP Script Engine script must contain a function called 'translate' that takes in an object called 'model'. This function must return the input object called 'model'. You have the option to include additional functions within the script, as long as the initial translate function remains intact, as it serves as the entry point for the script.
By clicking the 'Save & Validate' button on this page, you will perform several actions. Firstly, it will check if the above criteria are true. Next, it will compile the JavaScript and ensure that it compiles without any errors. Lastly, it will run an empty MCO object through to ensure that no runtime errors occur. If all of these steps are successful, you will receive a notification confirming this. If not, the error will be displayed on this page.
Once you have made the necessary modifications to the script and successfully validated it, you can proceed to enable your Job.
Please be aware that external API calls and importing external files are not allowed. If you try to do so, it will cause an error and the Job will result in a Critical error, preventing any data from being processed.
SynchUP Script Engine Examples
The possibilities for your Script are limited only by your imagination and the power of JavaScript syntax. Here are some fundamental and frequently used examples of what you can achieve with the SynchUP Script Engine.
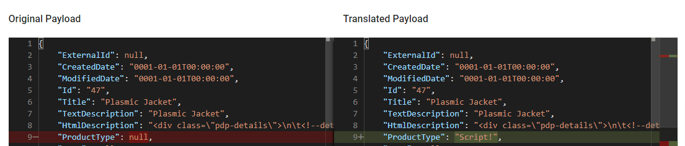
1. Modifying Concrete MCO Properties
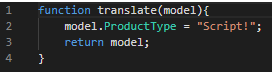
Modifying the value of a specific MCO concrete property is a straightforward task. All you need to do is refer to the property you wish to modify and assign it a new value.
Example Script:
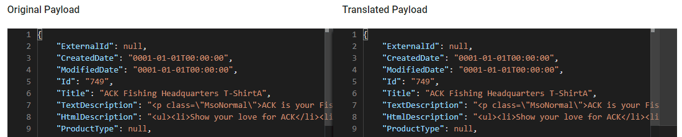
Output:

Note: You can only reference concrete properties that exist on the MCO. Attempting to add or edit properties on the model object that do not exist on the MCO will result in no change to the MCO.
2. Using JavaScript logic
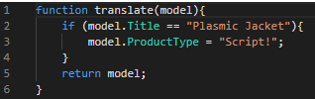
JavaScript logic syntax is a powerful tool that allows you to selectively modify specific properties. By using if/else syntax, you can easily achieve this level of customization.
Example Script:
Output with logic = false:
Output with logic = true:
3. MCO Attributes
In contrast to concrete properties on the MCO, attributes are not mandatory to exist. You have the flexibility to modify existing attributes or introduce new ones. Additionally, similar to concrete properties, you can incorporate MCO attributes into your JavaScript logic.
Example Script:
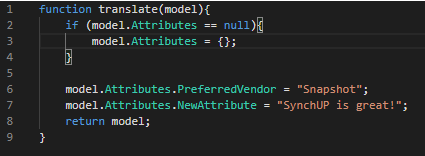
Output:

Make sure not to overlook null references! Take note of the example above where we verified if 'model.Attributes' was null before accessing it. If it was null, we created a new instance of it. Always remember to check for nulls when accessing child objects on the MCO!
4. Editing Arrays
You have the ability to access and make changes to arrays within the SynchUP Script Engine. All the aforementioned rules still apply, but you can utilize the JavaScript syntax 'forEach' to achieve this. The following script would append the attribute "NewField" to all User children. However, you can implement logic to modify specific children based on different use cases.
Example Script:
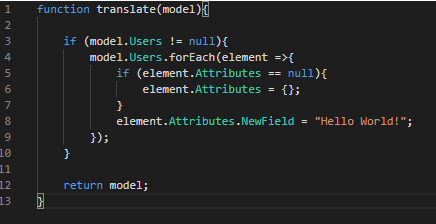
Output:
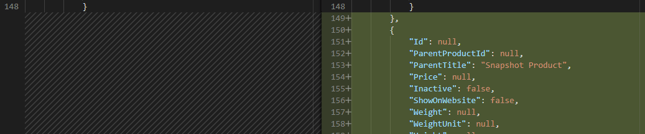
5. Adding an Element to an Array
Sometimes, you may need to add extra elements to an array. Here's a straightforward example of how you can add a complex element to an array. You can combine this with logic and other syntax to manipulate and transform other array elements as needed.
Example Script:
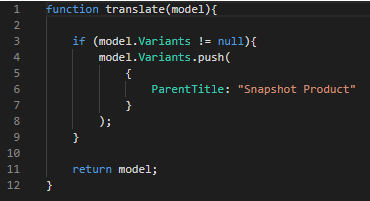
Output:
6. Removing an Element from an Array
At times, there may be a need to eliminate a particular element from an array. This could be due to a preference of not including the data in the destination system while avoiding any modifications to the source system. Whatever the motive, here is an example of how you can achieve this.
Example Script:

Output:

